Share |

Wednesday, October 31, 2012

Halloween Candied Pretzels


Here is the perfect munchie for Halloween night to keep you from eating all the candy you are passing out to the Trick or Treaters! Even I am guilty of swiping all the grape candies from the candy bowl. But I make these to keep the rest of the family away from the chocolate candy bars! Make these in the morning. It takes minutes. Let them sit on the counter all day and harden. Hide them once the family gets home or they will disappear!


Halloween Candied Pretzels


3 cups of Pretzels

1 cup white chocolate chips

1 cup semi-sweet chocolate chips

1 cup Reese's Pieces

1 cup Halloween M&Ms (or just the orange and brown ones)


Line a cookie sweet with Foil. I like to spray with cooking spray and then take a paper towel and wipe it away so it isn't greasy but the chocolate wont stick. Technically you don't need to but it's one of my many compulsions.

Line tray with pretzels. I like this brand because they are whole wheat and I can tell myself it's "healthy!"


In a microwave proof bowl, put one of the varieties of chocolate chips in and microwave for a minute and half on 60% power. It will look not completely melted. Stir and you will see it is perfect.


Drizzle with a spoon over the pretzels. Take half the candy and sprinkle over the first layer of drizzled chocolate.


Now melt the other variety and repeat the process. I like to really cover this last layer of chocolate with lots of candy.


Let cool at least two hours. Break apart and enjoy!

Monday, October 22, 2012

Butter Dip Biscuits

My favorite niece (I only have one so she gets to be my favorite and get all my attention) posted these on Facebook. Check out the blog that they came from. Lots of great recipes! My niece shares my love of cooking. We both have amazing memories of our Gram and her cooking. Our Gram would have loved these biscuits! Easy to make. I'm serving them along side a salad to make me feel better with the amount of butter in the dish. These are amazing the next day with some honey or jam.

Butter Dip Biscuits
recipe adapted from
The Country Cook
Ingredients:
1 stick (1/2 cup) unsalted butter (see notes below)
2 1/2 cups all-purpose flour
4 tsp. granulated sugar
4 tsp. baking powder
2 tsp. kosher salt
1 3/4 cup buttermilk (see notes below)
The Country Cook's Directions:
Preheat oven to 450F degrees.
Spray an 8-inch square baking dish with nonstick cooking spray.
In a microwave-safe bowl (or you can use the baking dish that you'll be baking these in), melt stick of butter in the microwave.
In a medium bowl, mix together the flour, sugar, baking powder and salt.
Pour in the buttermilk.  Stir until a loose dough forms. Dough will be sticky.
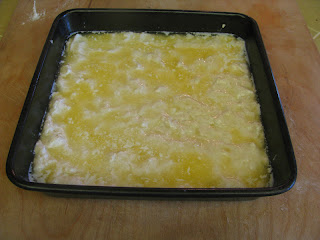
Press biscuit dough into baking dish (right on top of the melted butter).
It is easiest to spread it out with your hands.
Take a sharp knife and cut the biscuit dough into 9 squares before baking.
Bake for about 20-25 minutes, rotating once during baking.
If you notice that some of the butter that is coming up to the top is getting brown, just take a paper towel and dab around the edges a bit.
Oven times do vary since different ovens have different hot spots, but basically biscuits should be golden brown on top and spring back to the touch.
Cook’s Note:   I really recommend only using buttermilk with these but if all you have on hand is regular milk southerners call it sweet milk) then you can use that (just not skim milk, that stuff is far too watery).  Keep in mind though that when you use regular milk, you'll have to cut back on the amount you use because regular milk is much thinner than buttermilk.  You may need to use about
1 1/4 cups - 1 1/2 cups (start with less, you can always add more in).
 The buttermilk adds such great flavor to these biscuits so if you can get your hands on some,
definitely give it a try. Also, if you use salted butter, make sure you leave out the additional salt that is added to the dough.

How I Did it;
Here's what you will need
Take your dry ingredients in a bowl
Add buttermilk. I didnt have any so I made my own. You can take some milk and add a TB of vinegar to it. It will resemble a drop biscuit.
Melt the butter in the micro
Dump into the pan you will bake
Add the biscuit and with your fingers flatten out.
take a knife and cut into nine biscuits
bake 450 preheated oven for 20 to 25 minutes

Try to wait till it wont burn your mouth to eat. Fat chance in my house.


Friday, October 19, 2012

Sun Dried Tomato Rice

If you follow my blog you know I'm a little crazy about sun dried tomatoes. I put them in my pasta when The Fireman is working. If I cover broccoli with them, you can guarantee I won't touch the rest of the meal.  I've made my own side dish pasta with them. Why not rice too?  Rice is tough to cook in my Dino of a kitchen so the rice cooker helps out. My son is a picky eater. He eats clean unless crap is on the menu so I'm making a batch of plain white rice first while softening some onion on my cast iron pan. Now you would be doing this in a sauce pan so do as I do. (I just had a moment! I sounded like my mother and I work so hard to not sound like my mother...) ok carrying on...


Sun Dried Tomato Rice
This will seem a little crazy because I used two pans and a rice cooker but I think it was because I didnt have my pots in order. One pan is plenty. lol I knew what I wanted to do but once my pan was dirty I needed anothe one.

1 TB oil
1/4 onion diced
1- 2 garlic cloves  minced maybe more (just because I love garlic)
2 cups long-grain white rice
4-6 oil-packed sun-dried tomato halves chopped (or buy the diced one and add 1/4 cup)
2 tablespoons tomato paste
1 teaspoon salt
3 cups chicken broth

 So dice up a little onion, white...red..yellow, it doesnt matter
 get a little oil heated for the onion
 chop up your garlic, I love doing this
 chop up the sun dried tomato. I do not love doing this, but I love sun dried tomatoes
 so cook up the onions so they are not raw and add the garlic
 add the tomatoes
 I love that tomato paste is in a tube now.
 Add two TB to the pan
 I love my rice cooker!
 In another pan toast the rice
 Add the toasted rice to the tomato mixture
Coat everything (better here than in the rice cooker- and if you are not doing this in a rice cooker but in a pot, that is ok)
 Dump into the rice cooker
 Add the chicken stock or water
 Press cook or cover with a lid and simmer and cook.
 Fluff with a fork and serve. Hoard from the family.


Wednesday, October 17, 2012

Flat Roasted Chicken with Pan Gravy


I got the idea for this from Lucinda Scala Quinn. She has this great blog Mad Hungry. But I will be honest as I give you the link to her recipe that I did not follow her recipe one bit as I dont follow directions very well. I went as far as the kitchen spears and the cast iron pan and that is where her's and mine differs. But I will give you her recipe none the less in full because she gives beautiful description of how to  cut the bird. One note, she makes a different gravy than what we are making. I wanted to make her pan sauce but my boys prefer my pan gravy. And you have to cook what you boys like.

Flat Roasted Chicken with Pan Gravy
recipe adapted by
Lucinda Scala Quinn's "Mad Hungry"

1 whole (3- to 4-pound) chicken
Coarse salt and freshly ground black pepper
1/4 cup extra-virgin olive oil
2 tablespoons unsalted butter
3 tablespoons fresh lemon juice
1/4 teaspoon crushed red-pepper flakes
2 cloves garlic, smashed and peeled

Lucinda's Directions

Preheat oven to 400 degrees. Using kitchen shears, cut along both sides of the backbone to remove; discard or reserve for broth, if desired. Open the chicken's legs and spread the bird down flat, skin side up. Press down firmly on the breastbone to flatten. Pat dry with paper towels; season generously with salt and pepper.
Heat a large ovenproof skillet, preferably cast-iron, over high heat. Add 1 tablespoon olive oil and 1 tablespoon butter. Add chicken, skin-side down, to skillet. Let brown without moving, about 3 minutes. Turn chicken, taking care not to break the skin; transfer skillet to oven.
Roast chicken until golden brown and cooked through or until an instant-read thermometer inserted into the thickest part reaches 165 degrees. Transfer chicken to a cutting board and let stand 10 minutes.
(I did not do this step)

Add 1 tablespoon lemon juice and remaining tablespoon butter to pan, swirling to combine; set aside. In a small bowl, whisk together remaining 3 tablespoons olive oil, 2 tablespoons lemon juice, red-pepper flakes, garlic, and pinch of salt. Cut chicken into pieces and serve immediately drizzled with olive oil mixture and pan sauce.

Ok so here is my bird :)
I opted to let The Fireman cut the bird.

Once you get the back bone cut out, take a paper towel to it, just to make sure it is really dry

I salted and peppered it
Melt some butter and olive oil in a cast iron pan. It really must be a cast iron pan. Do this on the stove
place the bird skin side down. I seasoned the inside of the bird too
I put another pan on the bird just to weight it down
Now she isnt kidding when she says to carefully turn it over to not tear the skin. Oh well.
Place in the oven and cook till completely cooked. I would like to say that she gives a time but she doesn't. My oven is a dinosaur. It took about an hour
Place the bird on a cutting board and let rest for about ten minutes before cutting into pieces
while waiting, make some gravy. This is all you need! This is the secret to my perfect gravy!
Take a couple Tablespoons of the flour (you could use regular flour but I love Wondra flour-no lumps) and whisk into the existing oil in the pan. If you think you have two TB of oil, add two TB of flour.
let it cook for a minute
add chicken stock
pour over your meat and eat!!

Related Posts with Thumbnails
Proud member of FoodBlogs